Screen Capture
Capturing moments on the laptop or Mac screen is essential and useful for many objectives, whether you are documenting an issue for troubleshooting, saving a memorable moment on your Mac screen, or simply sharing an interest with others from your laptop screen. MacOS provides several built-in methods for taking screenshots from your laptop’s screen.
Computer screenshot-taking is a primary skill that can be useful for many reasons. Whether you’re trying to capture an error message, post a hilarious meme, or document vital information, knowing how to take screenshots is important. This inclusive guide looks at various screen capture methods on Windows and Mac laptops.
In this blog, we will explore the methods to take screenshots from your laptop or Mac screen and provide step-by-step instructions for each method to take screenshots from your Mac screen.

Screenshot Capturing on a laptop or Mac
Method 1: Full-Screen Screenshot
Method 2: Take a screenshot of the specific area
Method 3: Take a screenshot of the specific window
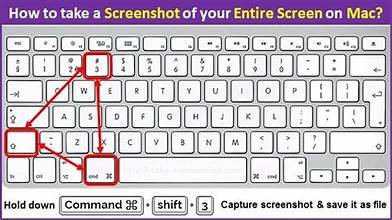
1. Full-screen screenshot on Mac or laptop:
Taking screenshots of the full screen on a laptop is the most common screenshot requirement. For this:
a.Press command (⌘) + Shift + 3 simultaneously to screenshot the entire Mac screen.
b.When you take a screenshot of the full screen on your laptop or Mac, you will hear the camera shutter sound. The screenshot will then be saved on your desktop or in the folder you select to save it in your laptop or Mac storage. Before saving the screenshot, it will appear on the screen of your laptop or Mac with the name something like “Screenshot (date) at (time).org.”
2. Take a Screenshot of a specific Area:
If you want to take a screenshot of a specific part of your screen of laptop or Mac, follow these steps to take screens shot of a specific part of your Mac screen:
1. Press Command (⌘) + Shift + 4 to screenshot a specific portion of your laptop or Mac screen.
2. Your cursor will change into a crosshair to take screenshots on Mac’s screen.
3. Press right-click and drag to select the portion of the laptop screen from which you want to capture a screenshot.
4. Release the mouse click or release the trackpad button.
5. Again, you will hear the sound of the camera shutter, and a screenshot of your Mac screen that you selected to capture will be saved in your Mac storage.
3. Taking screenshots of specific windows:
To take or capture screenshots of specific windows or menus on your Mac or laptop :
1. Press Command (⌘) + Shift + 4 to screenshot a specific window or menu on your Mac or laptop.
2. Press the spacebar button on your laptop.
3. Press the spacebar button of your laptop or Mac to turn the cursor into a camera icon.
4. Then, move the camera icon (made by pressing the spacebar button) over the window or menu of your laptop that you want to capture.
5. The portion where you move the camera icon is highlighted and selected to capture screenshots from your laptop screen.
6. Now, click on the window or menu to capture a screenshot.
7. Then, you will hear the same camera shutter sound because the screenshot is captured from your laptop or Mac screen.
8. As soon as you hear the camera shutter sound, the screenshot will be saved to your laptop or Mac storage.
Before saving a screenshot on your laptop or Mac, it will appear on the screen with the name “Screenshot (date) at (time).org.”
4. Capturing screenshots and copying them to the clipboard:
Sometimes, you want to capture screenshots from your laptop or Mac screen, but you do not want to save captured screenshots directly in laptop storage. Sometimes, you want to paste screenshots directly to a clipboard, document, or any image editor.
To capture the screenshot from your laptop and copy it to the clipboard:
1. Press Command (⌘) + Control + Shift + 3 to capture the screenshot of the entire or full screen from your laptop or Mac.
2. Press Command (⌘) + Control + Shift + 4 to capture a screenshot from a selected area of your laptop or Mac screen.
3. As you capture the screenshots from your laptop or Mac screen, press ctrl + C to copy the screenshot to the clipboard.
4. To paste it into your desired application or software on your laptop or Mac, press ctrl + v. Hense. The screenshot is pasted to your desired place.

Conclusion:
Taking screenshots on your laptop or Mac is a simple process, and it is very important and useful. As we discussed above, you can take screenshots on a laptop or Mac, capture screen screenshots, capture screenshots of selected portions, capture screenshots of specific windows or menus, and paste captured screenshots into a clipboard or desired application or software. Hopefully, you all understand the process of capturing screenshots using different methods and types on your laptop or Mac.
By learning these techniques, you can quickly capture and share information, troubleshoot issues, or simply capture memorable moments on your Mac or laptop.
Thanks For Joining Us